Showing posts with label art making. Show all posts

Thursday, January 9, 2014

How to Find Your Horizon, or Eye-Level

Horizon (finding your eye-level)

Try this:
1) sit up straight
2) with your head level, look out at what's in front of you.
3) pretend you are shooting laser beams from your eyeballs; make sure those laser beams are shooting parallel to the ground.
4) wherever your eyeball laser beams hit, that is your eye level.


"Eye-level" is the exact same thing as "horizon."


Try this next time you're at the beach:
1) stand facing the ocean
2) look where the water meets the sky
3) we all know that as the horizon, but now think of it as eye-level
4) slowly lower yourself down to the sand, but keep your sights on that horizon
5) notice how the horizon moves down with you
6) lay down on the sand
6) where's your horizon?

It's still right there, in front of your eyes.
The horizon moves with the level of your eyes. An immovable horizon would require you to look up at the horizon, as you lowered your body to the sand.

No beach nearby? How about the desert? Here's the view of my drive home from Las Vegas last weekend:


And there's the horizon, straight out in front of my laser-beam eyeballs. And look - the highway comes to a point on my horizon-eye-level. Notice how incredibly WIDE the highway looks at the bottom of the photo, and how incredibly QUICKLY it narrows to a point as it goes back in space. This is a classic example of one-point perspective. 

Here's another example:

All the parallel lines are going back to the same ONE POINT on the horizon (hence the one-point perspective.) Even the lines of the truck. Check it out! Place a ruler over your screen and see where all those lines go: the truck, the road, even the brush at the edge of the road's shoulder.  

Everything on this long ride through the desert is zooming towards the same itty-bitty spot on my horizon. Why "my" horizon? Because it's my eye-level. Your eye level (you being taller or shorter) is different than mine. 

My horizon is mine. Your horizon is yours. (Think about that, and I dare you not to get all philosophical.) 

And one more amazing thing about the desert views. . . atmospheric perspective! 

The atmosphere creates the feeling of space.

More in a later post, about why horizon/eye-level is important, and about using both types of perspective to your advantage in any drawing (not just landscapes). For now, practice shooting laser beams from your eyeballs. 


Saturday, December 7, 2013

Trash Heap Inspiration

I love to walk the empty hills and forgotten, half-finished roads of my Los Angeles neighborhood. I can take my dog off leash, and it is peaceful.


The urban views are great, (hmm, maybe a photo class field trip in the making) but what I most adore, is my beloved "Trash Heap." 

A relatively quiet day at the Trash Heap. The city comes by regularly to haul it away.
I can't help but be a little disappointed when I come across a recently emptied spot.

Two places along the hillside roads have become common illegal dump sites for the most wonderful variety of things. I know I'm supposed to be outraged, but I'm enamored. From construction material to children's toys to love letters, I've found it all.  Sometimes I bring things home to use in the home or garden:

These glass blocks came home with me. They are now book ends.
I considered taking home this angel head,
but when someone else created a "City of the Angels" art piece by tangling it in the fence, I left it there.
 
And some bamboo came home to replace a broken gate.
I bring home inspiration for my artwork, too. I'm currently working on a series of paintings based on papers found at the trash heap.
"Wishes; 1 - 100" oil on wood panel
This is from a child's first attempt at writing numbers 1 - 100. Dated on the back of the paper, saved since 1992, and now dumped at the trash heap. It seemed too special to pass by. A treasure map of sorts. See more of my artwork here.

Stay tuned for more Trash Heap Inspirations and Adventures..

Thursday, August 29, 2013

Getting Back in the Studio

July and August are hectic months when I rarely get into my studio. 
July is Summer of Art at Otis College of Art and Design. Long, intense hours of teaching. But it's my favorite teaching assignment and each year I find myself saying: "That was my best group of young artists, ever!"
I say it every year. And every year I mean it!

Summer of Art student work. Final project: "Object with Meaning"

Summer of Art student work, final project


(To be honest, I haven't always said that. A few summers ago several students and parents pushed me to believe that I was DONE with teaching. But that's a 'nother story.)

And then, August is camping at the beach.
Camping at the Beach - nothing better
Summer of Art and camping are over now, and I'm back in my studio, relaxed and ready to work. 

After a slow start earlier this week, the inspiration is now coming fast and furious. I'm finishing a series of paintings, and have plans for a new series. An unexpected installation piece is taking shape on my studio wall and on my work table there's a long list of thoughts and projects. Pretty cool.

They say you can't wait for inspiration, you just have to get in the studio and get to work. Put pen to paper, or brush to canvas, or camera to eye, and begin. Something will happen, that's the promise.

And then, there are those days when inspiration is everywhere. When it's easy and you can't turn it off if you wanted to. When, even in the bathroom, sitting, thinking of nothing . . . 

Inspiration in a bath mat
 . .  .  a ragged, dirty bath mat catches your attention.

Nothing else to do, but go back in the studio, and be thankful for inspiration, no matter what the source.
Angry Frilly Fish Puppet


Saturday, August 17, 2013

Homeschoolers taking pictures at Union Station

So, I led a photo walking tour in downtown Los Angeles with a bunch of homeschoolers. First stop was Union Station.

We introduced ourselves, then I said, "Go take some pictures."
(Ok, I said more than that. But not really.)


And they did. (Go take pictures, I mean.)


After a while, we regrouped and looked at some of their shots.

We huddled around our cameras.
We "oohed," we "aahed.

We discussed.

We held a mini-critique right in the middle of a train station.

Then I said, "Go take more pictures."

And they did . . . .


And just like always . . .

. . . they amazed me.

Sunday, June 9, 2013

Sometimes I Get Sad

Sometimes I get sad and lost.
Sometimes I can't remember what I'm doing, or why I'm doing it.
Sometimes I just feel sorry for myself.

But then, I get to go back to work. And I remember how I get to spend my Saturdays surrounded by young people doing amazing things. Then I remember how I have a job that knocks my socks off, gives me goose bumps, makes me suck in my breath . . .

. . . and still allows me the time to go in my studio to do my own art work. . .


. . . then come home to a dog sleeping with his little pillow . . .
 

Sometimes I can't remember why I was ever feeling sorry for myself.

Monday, October 8, 2012

Overheard


Woman to companion, as they exited the Museum of Contemporary Art (MOCA) in downtown Los Angeles: "It's exhausting, all of this art, isn't it?" 

My weary head nodded in agreement as I headed home.

Friday, September 28, 2012

The How of It

Art college for the fine artist is all about the why of it - theory and critique. It's all about figuring out why you are making art.

In art college, very little is directed to the how of it. No one taught me how to prepare a canvas or organize a palette of colors. No one showed me how Rembrandt or Rubens painted.

Now, it's time to learn the how.

I'm taking a painting class that is the exact opposite of the painting classes I had in college. This one is all technique and no content. No one cares why I'm painting; they only care how.  A hard mental switch, and a slow process of painting. But I'm happy. (See the finished painting here)

The underdrawing on my carefully prepared wooden panel

Wednesday, September 5, 2012

Parents, Friends, Grown-ups

Drawing "class" at Otis
Found in the photo archives of the Los Angeles Public Library

Many parents, friends, and otherwise grown-ups have said, "I want to take a class with you."

Was that you? Maybe you were caught up in the excitement and only half-kidding, but I do have a class or two for you:

This Saturday, September 8, begins my next 10-week sessions at Otis. These are observational drawing classes, beginning and advanced, taught on the campus of Otis College of Art and Design in the Westchester neighborhood of Los Angeles (near LAX). Open to students of all ages, (high school and up) these classes are billed as "Portfolio Development" for people working towards art college admissions. But people take my class for a variety of reasons. For some, it's their very first drawing class ever; sometimes older students are looking to change careers to the art/design field; I've had others who for years have taken art classes in their spare time, with no intention of attending art school; and still others who are putting the finishing touches on their admissions portfolio, working up the courage and the mind-set for art college.

It doesn't matter to me what your reason for taking my class; I'm just glad you'll be there. And if you grown-ups are worried about it, I guarantee you won't be the oldest student I've taught.

Sunday, July 22, 2012

So Worth It

July is pretty crazy for me. I work almost every day of the week, on my feet for 7 hours, commuting at least an hour each way, no air conditioning in my car. (Last Thursday it took 2 hours to get home!) I arrive home with just enough energy to eat dinner (provided by my son - YAY son!) and then fall asleep before my head hits the pillow. The other night, my dreams were about being exhausted.

Sunday is my recooperating day, and boy do I need it. Though by late Sunday afternoon I always start thinking about my classes again.

But it isn't with dread of the coming Monday. It's with eager anticipation.

I actually start looking forward to it all again. I forget the commute, the tired feet, the exhausted brain.
Instead, I remember the thrill I get when a beginning student pulls together a drawing like this . . .


. . . and I remember the look on that student's face when she realizes that she can do something that she didn't even know was in her.

And I can't wait for tomorrow when I get to see her finished drawing (see up there on the top right?) even though I already gave her an 'A' and there's no reason to go that extra mile except that now she knows that it's worth it.

So worth it.


Tuesday, June 26, 2012

Fun Objects, Amazing Students

Back to another session of Observational Drawing at Otis College of Art and Design. I find myself saying it every new session: "These are my best students, EVER."  And I'm saying it again!


Besides the floating pear (it's not finished) this is a rather AMAZING drawing to be coming out of a beginning drawing student. Give it a cast shadow and that pear will settle right down.


And this . . .
She even missed a day of class and still got right down to work to produce this drawing (above). Confidence, willingness, committment . . . look what we get!

And a close up of this one . . . just makes me smile. Besides being a nice use of the charcoal, doesn't it look like that pig is so enjoying a scratch under the chin?

We are so lucky to have use of this room at Otis College. Such a treat to spend my Saturdays in a room filled with fun objects and fantastic students.

Thursday, June 14, 2012

How to Clean a Bone


If you happen to find a bone . . . first - OFFER IT TO ME.


But let's pretend you want to keep your bone. It probably needs a bit of cleaning. Most people think they should boil or bleach it. STOP. Both of those methods are bad for your bone. Here's all you need to do:

1. Remove as much remaining animal matter as possible.

This little bone is pretty clean, but still needs a bit of work.

2. Place the bone in water; leave it in a warm spot.

Beware of two things:  a.) It can get smelly, so you don't want it on top of your refrigerator. b.) It can get smelly, so if you leave it outside some other animal may decide it's a tasty treat.

3. Replace with fresh water often. Keep changing the water until it stays clear.

Beware of one thing: sometimes teeth fall out during this process so be careful when you dump that water. Teeth are the best part and you don't want to lose them.
This is my student's super cool dog skull. It's just about ready.

4. When the water stays clear, it's time to submerge it in hydrogen peroxide. (Bleach will make your bone brittle.) Leave it in the hydrogen peroxide until it's the desired whiteness.

5. Now it should be clean and white, and ready for anything. Even some gold leaf.

"Corpus Delicti, Cat Skull"

Tuesday, May 15, 2012

How I Spent Mother's Day


Here's how I spent my Mother's Day . . .
. . . drawing tiny fruit. Each piece of fruit is 1-1/2 inches square. The entire sheet is just under 8-1/2" x 11".  Later I will cut, heat, and shrink them down to about 5/8" each.

Believe it or not, spending hours drawing tiny fruit makes me pretty happy.

The only thing that made it even better . . .
. . . taking a long break to lay in the hammock in the back yard while my guys bar-b-cued ribs and bacon-wrapped corn on the cob.

As I lay in the hammock, listening to the birds and the conversation, I noticed how unusually quiet it was in our little section of northeast L.A. - no baseball games at the park, no cars racing down Eastern Ave., not even a police helicopter circling overhead. Everyone, it seems, was at home quietly celebrating their mom.

Monday, March 26, 2012

Process vs. Mistakes

"Learn from your Mistakes." We've been told this over and over throughout our lives. I've probably said it myself, thinking it good advice.

And while it is true, it doesn't really help.

When I think about the mistakes that I've made in my life, my face starts to burn, my breath comes shallow, and I push those thoughts aside. Mistakes are for moving on from, forgetting, leaving them behind. 

Mistakes are for erasing.

In the continuing saga of my life drawing class, I have been horrified by my mistakes. I've wanted to hide them, they make me nervous, my face starts to burn . . . . And that of course makes it impossible for me to learn from them.

But a couple weeks ago I remembered - I love process. I seem to love the doing more than the final product. So why haven't I been able to enjoy the process of learning to draw the figure?

I love being in the classroom; I love the luxury of three uninterrupted hours of drawing; I love sitting on those uncomfortable drawing horses; I love moving my hand and arm around in front of a big piece of paper; I love glancing back and forth between model and drawing, model and drawing. So why was I feeling so frustrated and defeated?

And then I had it: Substitute the word process for the word mistakes.

"Learn from your Mistakes the Process!" 

And you know what? Last week, finally, after 6 weeks of classes, I started getting it. I started relaxing, and making steps towards some work I could be proud of.

I no longer feel like I'm making horrible mistakes. Instead, I can look at what I've done, even my most alarmingly awkward figure drawings, and be happy because I am learning from the process.

Wednesday, March 7, 2012

How to Stop the Circle of Doubt

I came home from my life drawing class last night frustrated and defeated. So defeated that I wanted to throw up my hands and give up on all my current creative pursuits. Felt like such a poser. "Whoever said I was good at this? Not me!"

Pulling myself together enough this morning to sit at my work table and make something, I sorted through the bits and pieces and came across this:
Donkey is the name of my Golden Retriever

I don't know how much it really helped, but it certainly gave me a moment to get out of my head and stop the endless circle of doubt. (Donkey is the name of my Golden Retriever, I talk about him here.)

And then in floated my teacher's words from the first day of class: "Most of you will want to quit around the middle of the semester, some of you will disappear." Guess what? Next week is the middle of the semester. Maybe I'm not so terrible. Maybe, in fact, I'm right on track.

I think I might make myself a name tag with this "My Donkey is _____" scrap of paper. Then, next week when I'm frustrated again (and I know I will be), I'm going to pause, read my name tag, stop the circle of doubt, and get on with it!

Wednesday, February 15, 2012

Becoming a Student Again


I tell my students that drawing is scary.

But on Tuesday nights, I remove my teacher's persona, and I become the student. It's hard.

I'm taking a life drawing class at Otis. My teacher is my colleague. And I'm exposing to him (and all the world) a huge gap in my knowledge.


In a life drawing class we draw from a live nude model. Everything in a life drawing class feels vulnerable, including me.


When I walk into his class I need to be willing to be terrible. I can't be there with anything to prove.


Drawing is scary, I tell myself.
But in the end, it's just charcoal on a piece of paper.
And I'm better for it.


(These drawings are 3 to 5 minute poses from our second class meeting.)

Friday, February 3, 2012

A Family of Charcoal Drawings

Most of my classes are for older students (high school and above) who are working on portfolios for art college admissions. But sometimes I also teach younger people.

I don't know about you, but when I was 9 years old, I was still drawing goofy hearts and rainbows. Look what 9-year-olds are up to these days . . .


In this class for homeschoolers at Excellence in Education, I have a whole family - including Dad! They are a talented group.


We meet for only one hour, once a week. And again, my students amaze me.

Note: I apologize - when photographing the work, I did not have the youngest son's drawing with me, or I surely would have included it!

Sunday, January 15, 2012

The Thrills of the Public Library

I love my library. I can get almost any book and keep it for weeks on end, free of charge. It's rather amazing. 

I also love the little unexpected pleasures that come from sharing books with thousands of people all across the huge city of Los Angeles.

A while back, I read The Education of H*Y*M*A*N K*A*P*L*A*N by Leo Rosten. As I finished the last page, I felt pleased and satisfied. Not quite ready for the book to be over, I slowly turned the end page and found one last perfect word:
My reaction, exactly.
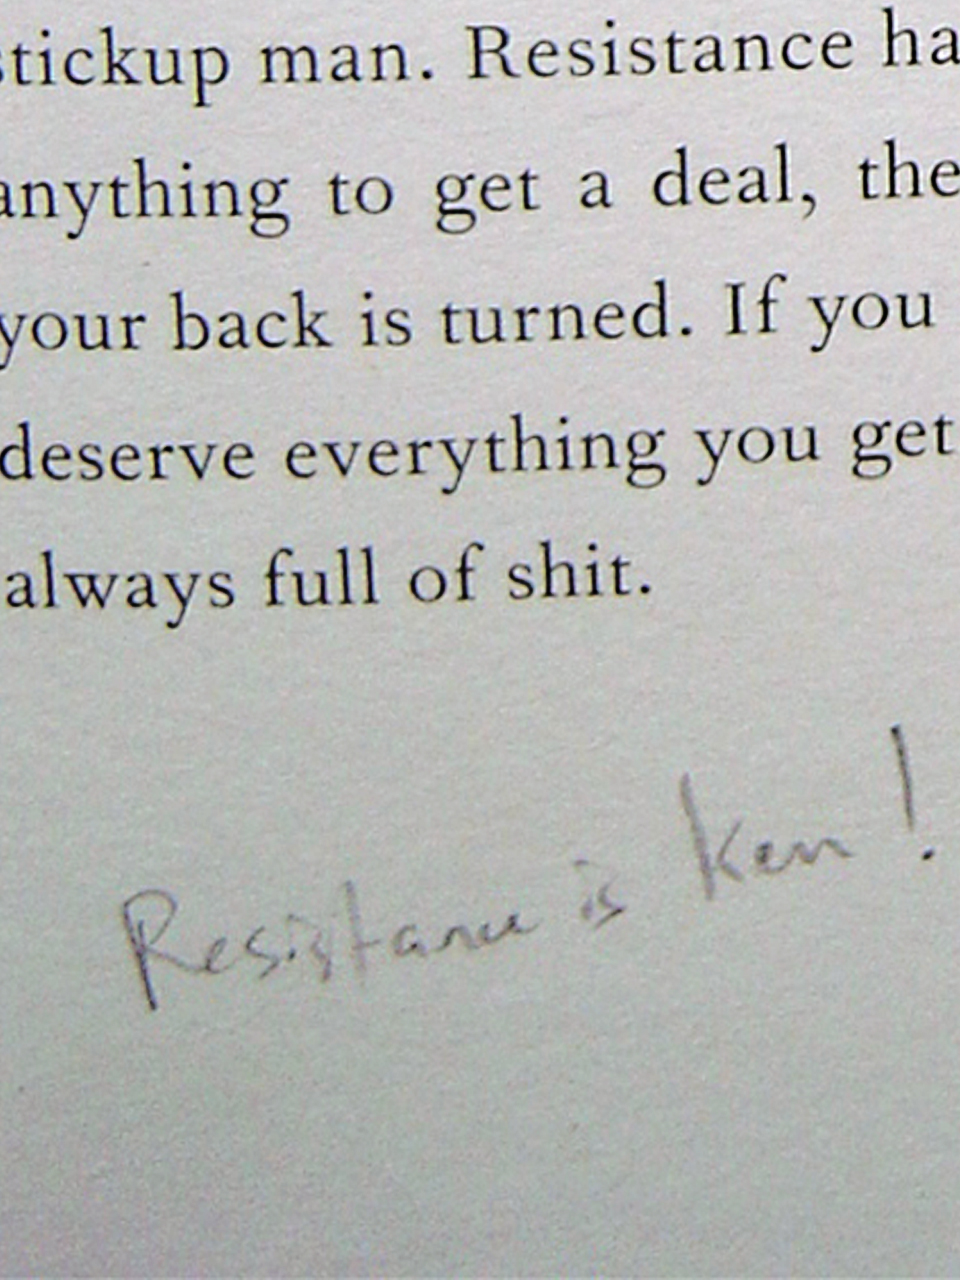
More recently I was reading The War of Art by Steven Pressfield. Lots of great insight about art making and the obstacles we encounter. A good portion of the book is about what the author calls "Resistance." It describes the self-sabotage that seems a part of most artists' lives. The reader cannot help but instantly recognize instances in their own life where resistance has played a major role in keeping success at bay. Here is a page that really got me thinking and examining the role of resistance in my life.


Let me zoom in and show you what else I found at the bottom of that page:


Apparently, I wasn't the only one examining their life.

Friday, December 30, 2011

How to Make a Plaster Tape Mask


Here are your tools: a container of water, a pile of newspaper, scissors (that you don't mind ruining), masking tape, plaster tape (I got mine from NASCO), a towel (that you don't mind ruining) for wiping your hands.

Cover your working space! This can get messy!

1.) Mash up the newspaper in the shape and size of your head. Tape the newspaper so it stays in the shape you want. You can measure your head if you want, but we just hold the lump up and ask, "Is this a good size for my head?"

2.) With more newspaper and tape, add the appendages of your choice - a big nose, horns, ears, warts, a beard.

3.) Cut the plaster tape into strips. I like them about 5" long and 3" wide, but it all depends on your mask.

4.) Dip the strips into water. Dip, don't soak. And immediately lay the strip over your newspaper shape. Smooth it a bit with your fingers. The plaster will fill in the gaps in the fabric mesh of the tape.

5.) FACE - Continue dipping, laying, smoothing the strips, criss-crossing them to add strength. Three layers of strips minimum. It dries stronger than you expect. Smooth it as much as you want. Cover the face of the mask, front only.

6.) EARS, HORNS, ETC - If you have small appendages - like the octopus legs, (don't worry, we know it only has 6 legs) - wrap the strips all the way around, front and back of the leg/horn/etc. Add a bit extra at the places where they connect to the face.

7.) Let it dry overnight.
(Don't throw the used water down the sink. Plaster is nasty in the drain. And don't wash the towel you've been wiping your hands on. Again, plaster is nasty in the drain.)

8.) When it's dry, pull out the newspaper. If it doesn't want to come out of the horns, let it stay. If there are any weak spots, you can add a few more strips of plaster tape.

 DON'T FORGET TO COVER YOUR WORKSPACE!
That's better.

9.) Hold it up to your face; mark some eye holes. Take it away from your face; cut the eye holes with an X-acto knife.

10.) Decorate! Paint, markers, collage, feathers, beads, ribbon . . . .  It's lightweight and sturdy and the possibilities for plaster tape go way beyond mask making.

My CoachArt students' finished masks.

Please Note: These masks are primarily for fun and decoration. If you want to wear your mask, I recommend careful brushing and cleaning to remove any bits of plaster dust (especially around eyes) and then lining the inside with felt.